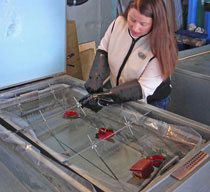

Jeanne Marie Zuleta works at the Clinbell tank to embed roses in
an ice block.
Photo credit: Max Zuleta

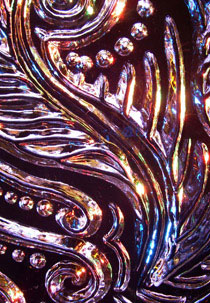
Aaron Costic’s photograph of a
detail on one of his sculptures.
The colors come from external
lights focused on the piece.
Photo credit: Aaron Costic
Elegant Ice
and Elegant Ice, abstracts
2. Circulating tank method. Clinebell® machine tank ice is created in blocks, 20x40x20," each weighing 300 lbs. The tank is a horizontal unit. The Clinebell company is a big Canadian company shipping ice to Australia, London, Africa, Germany… They create 3,000 blocks a month. With 2 machines “Art Below Zero” can make 4 blocks a day, which is not enough, so they buy from Chicago or Canada as well.
“This technique freezes from the bottom, going up. There is a water pump to move the water, same as used in water fountains or aquariums. It takes three days to “cook a block.” “Cooking” is ice company lingo for “freezing.” The purity of the water will affect the quality of this ice as well. “When we first moved to Chicago they told us that the water was good. It wasn’t. It was brown. So we first tried a water softener, it wasn’t good enough. Then we tried an industrial filter, it wasn’t good enough. Finally we tried a reversed osmosis system and finally got clear water for clear ice.” Later we’ll hear how the Clinebell machine is used to embed an object, such as a flower into the center of a piece of ice, cleanly.
3. “Can ice” is created in an aluminum mold, vertical mold. Clearwater is used, and submerged into high-grade glycol or alcohol. This glycol or alcohol transmits the cold and doesn’t freeze. The ice freezes from the outside to the inside. There is a tube in the center of the tank that goes to the bottom and blows bubbles into the bottom of the tank. It moves the water with a water pump or bubbles, takes the oxygen to the surface. You wait until the last minute before you take out the tube. Can ice is identifiable by a white “feather” in the center of the block, created in the process. In the last couple of hours of freezing the white feather is created by the “sides” going in.
If you want white ice you just turn off the pumps and even you will get an even white ice, because of the bubbles within the ice. Oxygen and impurities create “white ice.” More about white ice later.
How do you get color into ice? There are three ways. One is by focusing colored lights on the piece from below, behind, or the side. The colored light is caught in the ice and glows. Another way is to embed LED lights into the ice. Finally you can introduce pigments or dyes into the water before freezing.
1. Colored lights focused on the sculpture. This technique is used frequently in competition. It is nice to be able to view the art under “white light” and the more showy colored lights. With light bulbs the change is easy.
2. LED lights are used quite a bit at Harbin, for that magical quality of the ice structures erected there. Some of these lights may not be LED.
Max says that they embedded “little LED lights that changed color” into a dragon that they carved for an exhibition. The batteries lasted three days before they needed to be changed. Batteries run down faster in the cold. “You can’t use LED lights in competition, but you can use them in exhibitions.”
3. Colored dyes. We learned from Qifeng An that vegetable dyes are often used to color the ice blocks themselves, as at Harbin. Grace Chang, our Ice Alaska translator, added “you can lick it. It’s vegetable dye.” so presumably it isn’t toxic.
Max says that the technique for dying ice blocks is a little complicated. “The dyes, food coloring, have a tendency to settle. Every three to five hours you have to agitate the water for an even color. Or you can use a lot of pigment. He doesn’t use colored ice much because he doesn’t really like how the gelatin affects the quality of the ice. “It loses that “ice quality, the clarity.” One also can imagine that a melting colored ice sculpture might leave a bit of a mess in its wake.
Bubbles in the ice create white ice. It can also be created by the addition of pigments. An alabaster/stone effect can be achieved. “You can put milk in the water to create white ice. That will work if the project will be seen immediately, but if the project is three weeks away the milk starts to make the ice smell.” …more